This page is a compilation of a series of posts on cupping. To facilitate a better understanding of cupping, you may want to review an introduction to the connective tissues and their layered formation by reading Fascia Facts.
- What is Cupping?
- History of Cupping
- What Does Cupping Do?
- How Can You Know if the Skin and Hypodermis are Dysfunctional?
- What Conditions Can be Helped with Cupping?
- Who Uses Cupping?
- How to Use Cupping on Yourself or Someone Else
I love cupping! My only regret with using it is that I did not begin sooner. I stumbled upon it in 2016 or so. I, along with the rest of the viewing world, saw Michael Phelps, the Olympic swimmer, with circular bruises all around his shoulders. Prior to this I had heard of cupping but had no exposure to it. Fast forward: I use cupping on practically every person I treat! It’s not the answer to every problem, and it’s not the only intervention I utilize. But when it is the right technique to use and it is applied in the right location with proper dosing it can impart an incredible influence on the body. I remember using it once on a young woman who had pain in her anterior (front of the body) lower rib region following a surgery in the area years prior. Nothing seemed to help her pain, and she was truly suffering. I cupped her throughout the area and not only did it alleviate her pain, but also her constipation which had been present since childhood. Magic? Sort of, but not if you understand the anatomy and physiology of our amazing bodies.
What is Cupping?
Cupping basically involves the use of suction or a vacuum force applied to the surface of the skin. I guess you could use the hose of a vacuum cleaner, I never thought about it until now. Kind of hard to control the intensity of the suction at least with my central vac, so let’s not. More commonly cups are used, although some cultures used animal horns, pottery, or metal containers and still may (see the history section). The vacuum effect was often created by the practitioner placing the pointed end of the horn in their mouth and sucking. Fortunately we now have some alternatives on the market! Modern day cups are typically glass, hard plastic, or soft silicone depending on the technique used as well as the preference of the practitioner and patient. A vacuum or negative pressure is created in the cup, causing it to suction the skin and tissue below where applied. I explain to patients that it decompresses the hypodermis, which I’ll elaborate more in the physiology section. When using the soft silicone cups the vacuum is created by simply pressing the cup onto the skin (like pressing a button), making them very simple to apply especially for self or home treatment. This simplicity comes at the cost of versatility, specifically in terms of the amount of suction available (all or none). The hard plastic cups often have a valve at the top and come with a pump that creates the negative pressure (this is the type I use in practice). Glass cups are preferred by some, especially when heat is being used to create the vacuum effect. There are also electronic pump versions available which I have never used.


The History of Cupping
Believe me when I say cupping is nothing new. It has been utilized for thousands of years, and is also known as vacuum or suction therapy. No surprise that there is not consensus as to the origin of cupping, kind of like Ohio and North Carolina arguing about who was truly first in flight. Some sources credit the Chinese as early as 281 AD (with cupping, not flying), while others cite evidence that ancient Egyptian societies utilized cupping as far back as 1500 BC. There is evidence that primitive cultures utilized cupping, perhaps testimony to its ease of application and significant benefit.

We all know of Hippocrates, the Greek physician who so strongly influenced the healing arts that he continues to garner the title Father of Medicine. The Hippocratic Oath is still taken by many medical school graduates, and exhorts these exhausted individuals to “promise to share knowledge, to help the ill and not cause harm, and to never give a deadly drug or help another to use one.” Hmm. This should give us all pause, especially considering the recent OxyContin/Oxycodone debacle. I have this daydream of setting up a treatment table outside of a pain clinic or pharmacy. All I do is cup people coming and going and they are then able reduce or eliminate their pain meds. I don’t mean to discredit the help these places offer, or simplify the complexity of some people’s conditions. But I have both felt and seen how powerful cupping can be on painful conditions, without a long list of potential side effects. The simplicity and effectiveness of this intervention justifies at least considering it for pain control.

Hippocrates used cupping in practice until his death in 370 BC. He firmly believed in first tapping into an individual’s inherent capacity to heal naturally with massage, nutrition, cupping, rest, and exercise before resorting to pharmaceuticals. I have to wonder what he would think about our current medical model that typically overlooks many of these interventions preferring medications, especially in Western medicine. My training to become a physical therapist included absolutely nothing about cupping (don’t worry, I am now very competent with my cups!). This is a sad reflection of our “sophisticated” Western medical model. Yet I see the tide turning as people, be they patients or clinicians, become more open to exploring what other cultures/countries/mindsets have found to be beneficial. Other countries seem much more open to such interventions than what is mainstream for healthcare in the USA. I recall using cupping on a young girl to help reduce swelling from an ankle sprain she had sustained. Her mother, who was from Russia and sitting in the room while I cupped her daughter, related memories from her childhood of being cupped on her rib cage by her mother and grandmother back in Russia every time she was sick. It was the first thing they pulled out – not the Robitussin or antibiotics.


What Does Cupping Do?
As you can imagine there can be quite a variety of answers to this depending on the source, influenced by culture, beliefs, education, and experience. The short answer would be that cupping instigates a change in the body. In the past it was thought to draw unwanted substances from the body such as pus or poison from a wound site, and in some cases even evil spirits. More modern explanations of what cupping does include hyperemia (increasing blood flow to an area), and relaxing local soft tissues. It can also help to break up adipose (fat) deposits, edema/swelling, and help to soften up scar tissue so it’s more flexible. Traditional Chinese medicine practitioners often use cupping in conjunction with acupuncture to open energy channels and meridians.
I like what my good friend and colleague, Sue Falsone of Structure & Function has to say about it all. “There is no Eastern versus Western physiology – it’s all the same!” So from here I’ll talk about the physiology from my scientific and Western influence. As I mentioned earlier, I describe to my patients that cupping decompresses the hypodermis, which I’ll explain further. Understanding how cupping works its “magic” on so many issues necessitates an understanding of what structures it impacts.

From the top down, this layered formation is loaded with important stuff:
- Epidermis – the outermost layer of skin, which happens to be the most prevalent and highly innervated tissue in our body (see research slide below).
- Dermis – just below the epidermis. This layer holds the hair cells that participate in thermoregulation as well as fight/flight response. It also houses the sweat and oil glands, which have autonomic (involuntary) nerves dedicated to them regulating their function.
- Hypodermis – the name for the area below the dermis and above the deep fascia. It includes multiple structures that can be impacted with cupping:
- Adipose tissue – (the yellow filler in the above image) serves as energy storage as well as insulation.
- Superficial fascia – the wispy, membranous layer that divides the hypodermis in half. It serves as an important barrier between what we perceive in the outside environment and what’s going on inside the internal environment of our bodies.
- Vertical ligaments – (the upright and leaning columns in the above image). These connect the skin to the superficial fascia as well as the superficial fascia to the deep. With time these can become overstretched, owing to some of our sags and wrinkles.
- Multiple tiny nerves – (not pictured above, but located throughout the hypodermis) provide sensation to the skin, and also regulate function of the sweat and oil glands as well as the lymphatic and blood vessels. The majority of these nerves have an autonomic component, which means they communicate with the part of the nervous system that controls the involuntary functions of the body. More on this below.
- Multiple tiny blood vessels – (depicted in the above image as the red and blue lines) bring nutrition to the surface and carry waste products away. Fun fact: the majority of them work primarily to control thermoregulation.
- Lymph nodes and vessels – (not pictured above, but found just below the superficial fascia in the hypodermis) aid in the movement of fluid throughout the body.
- Loose connective tissue containing hyaluronan or hyaluronic acid (not pictured above, but found throughout the hypodermis) serves as a water-loving lubricant to keep things sliding and spaced apart. Hyaluronan is a key component in many age-defying and wrinkle resistant products.
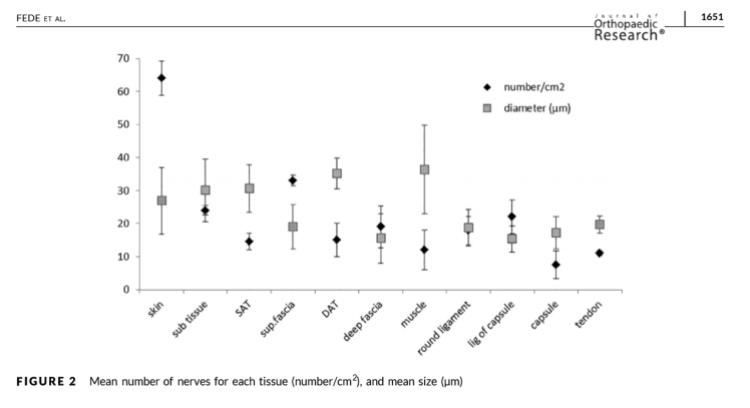
While all these structures are vital in their own way, I want to elaborate on the nerves in the skin and hypodermis. As illustrated in the chart above, researchers at the University of Padova, Italy took layered samples of the connective tissues in the hip (very similar to the lasagna slice) and evaluated them in cadavers and living subjects who were undergoing hip surgery. Layer by layer they analyzed both the number of nerves in each layer and the size of the nerves. There was little difference between the cadavers and live subjects in terms of findings. They found the greatest quantity of nerves (the black diamonds in the above chart) to be in the skin! We always think joints or muscles as causing all the pain, but not so. Second highest for number of nerves was still not the joint but the superficial fascia. No surprise that the muscle would have the largest nerves since they need them to contract.
As the nerves course to the surface they serve various functions, based on location, anatomy, and purpose. The autonomic nerves are not a completely separate component, but provide input along their path even to the muscles. However, they dominate at the surface where the majority of neural input to the skin and hypodermis is coming from and going back to the autonomic nervous system (ANS). This makes perfect sense since the skin and superficial tissues are like radar: they are constantly perceiving the surrounding environment in order to make adjustments that support homeostasis (optimal function of an organism). You step outside from a cool office into blistering heat and immediately your superficial blood vessels have to dilate to dissipate heat, or you will become overheated.

Time to circle back to the original topic of what cupping does. As mentioned earlier, cupping has the effect of decompressing the hypodermis as well as the skin. These structures can become thickened, stuck, condensed in response to overload – sort of like the deep fascia. This overload can come from direct trauma, like a fall on a shoulder, a kick in the thigh from a cow, or a surgery on the abdomen. But it can also become overloaded from environmental stressors such as cold, heat, chemicals (foods, medications, lotions, etc.), or even prolonged stress/anxiety. These can affect the skin and hypodermis by compromising the space and slide between all the structures coursing through that I listed earlier. I liken it to an area that should be like a nice chowder, thick and sturdy enough to support the contents yet also permit them freedom to move and function. In cases of dysfunction it becomes more like peanut butter, making it much harder for these structures to exist in it and function normally. The vacuum created in cupping helps to break up what gets stuck together, thickened, and dysfunctional in the these areas of the skin and hypodermis. Whether it’s a small isolated pocket of dysfunction or a broad area, cupping helps to “unstuck” these areas freeing up the nerves, glands, vessels, and other structures.

Are you starting to see how powerful this can be for influencing multiple systems and functions throughout the body? I’ve mentioned adipose, lymphatics, circulatory, sweat, oil, nerves – and they’re all talking to the autonomic nervous system (ANS) and participating in our immune, thermoregulation, and metabolic systems. It’s amazing! Think about all the medications on the market that target many of these organs and functions. Worthwhile to consider is the powerful impact we can have on these by properly identifying and addressing dysfunction in the skin and hypodermis. I like to say that cupping allows us to impact, massage, rock, kiss, unclog, decompress, and soothe the ANS. It is also a very powerful tool for changing the proliferation of scar tissue and influencing the formation of collagen fibers. When I’m dealing with a patient who has any form of dysfunction that is regulated by the ANS I like to bring cupping into treatment at some point. No wonder so many cultures have used it for so many problems for so many centuries!

How Can You Know if the Skin and Hypodermis are Dysfunctional?
Certainly in some cases the problem is clearly visible, such as with skin disorders like rashes, acne, varicose veins, excessive sweating or dry skin. But the skin doesn’t always manifest as problematic and point us in the right direction, even when there are underlying problems. Another visible manifestation of underlying issues can be the storage of excess adipose – the sophisticated word for fat. For some it is general and widespread throughout the body. Many others, even relatively thin folks, can harbor frustrating love handles and a muffin-top belly that can be very resistant to elimination, especially after childbirth. Lymphedema, the name for the abnormal accumulation of fluid typically in a limb, is often managed with compression garments and fluid reducing medications. All of these visible issues are often very stubborn, unresponsive to treatment, and at best managed but not resolved. Lab work and X-rays often reveal no problem and provide no clue as to where the source of a problem lurks. Some soft tissue issues may be visible on MRI depending on the method used and the person reading it. It’s also possible to view the soft tissues with diagnostic ultrasound. But such diagnostic tools are not always available, and can be costly to utilize (we don’t have them in our clinic).

Fortunately our best diagnostic tool is always “on hand” through palpation. The Fascial Manipulation Association logo highlights that “A Knowledgeable Hand is Potent,” and this holds true for palpating the superficial structures. When performed by a competent clinician, visual inspection and palpation can be very accurate for identify dysfunction of the skin and hypodermis. Palpation of the hypodermis is a skill that was not emphasized in my physical therapy training, but I have acquired with time, practice, and intention. It necessitates a lighter touch, which makes sense considering the superficial nature of the structures as compared to the deep fascia and muscles. It also requires an appreciation of the layered formation of the tissues – different structures will be found at different depths. This can be done as follows:
- Open hand – palpating for several characteristics: moisture/dryness of the skin; thickness of the underlying tissues – dysfunction will often feel dense, lumpy; and sensitivity, even to a light touch.
- Pincer – grasping or pinching the tissues from the skin down to the deep fascia between the thumb and fingers. Dysfunctional areas will typically be painful as the nerves are sensitized by the surrounding dysfunction.

What Conditions Can be Helped with Cupping?
By now I hope you can see the tremendous potential for impacting a multitude of issues by accessing the autonomic nervous system (ANS) through the skin and hypodermis. Most conditions have medications and interventions specifically for the symptoms they generate. But when you consider the fact that many of the pharmaceuticals available for such conditions are modifying the function of the ANS, it’s no wonder the list of potential side effects can be daunting. Without a multi-faceted approach that targets the underlying cause of the disorder, logic dictates that it will not resolve and the symptom alleviator will be needed ongoing. Many of these disorders can involve both the deep fascia as well as the superficial tissues. For deep fascial involvement my go-to is the Fascial Manipulation model, and when it involves internal dysfunction, I follow the model of Fascial Manipulation for Internal Dysfunction. When the skin and hypodermis are involved, I will generally pull out my lovely cups. Here are some of the problems and conditions I treat with cupping (along with other interventions):
- Adipose – cupping can help to break up adipose trapped in thick, dysfunctional parts of the hypodermis
- Circulation – cupping can free vessels struggling in a thick, dysfunctional environment in the hypodermis and superficial fascia.
- Digestion – yep. A host of digestive disorders (IBS, constipation, colitis) can have an element of dysfunction arising from the autonomic nerves trapped in the hypodermis of the trunk, especially the abdomen.
- Lymphedema – Cupping can serve to free up the lymph nodes and vessels that are unable to function in thickened areas of the hypodermis.
- Pain – remember, the skin is the most highly innervated tissue in our body. Pain attributed to deep structures (muscle, tendon, discs, large nerves, even organs) may be arising from the small superficial nerves as they course their way to the skin. Cupping can help to break up thickened tissue aggravating these nerves.
- Scars – cupping can help to reorganize the lay-down of collagen in the vicinity of a scar so it can heal as neatly as possible. Cupping can also free up nerve endings that may be trapped in the scar causing pain and sensitivity.
- Skin – can be very responsive to proper intervention targeting the superficial and deep tissues. This is one reason I LOVE skin issues! It’s like the body is drawing a roadmap of dysfunction and pleading for help in these places. Cupping can help to free up nerves, hair follicles, blood vessels, oil / sweat glands that are stuck in muck and can’t work properly.
Who Uses Cupping?
One refreshing fact about cupping is that no one (that I know of) claims it as their sole right and scope of practice, arguing that other practitioners cannot use it. Hooray for that! Turf battles exist in all walks of life, and health care is no exception. There are some acupuncturists who passionately argue that they are the only ones who should yield a solid filament needle. Some chiropractors insist that they are the only ones who should do manipulation. Years ago when my husband was the president of the Virginia Physical Therapy Association we fought a brutal battle with chiropractors who attempted to prohibit us ever moving the spine – be it joint mobilization, manipulation, or even traction. Some physical therapists get very upset with the prospect of athletic trainers treating a non-athletic population. To me these sorts of wars are costly and distract us all from focusing on what we should be all about: helping people.

Cupping can be used by acupuncturists, athletic trainers, chiropractors, doctors, massage therapists, midwives, neuromuscular therapists, nurses, occupational therapists, physical therapists, and anyone else I left off the list here. There is no requirement of training or licensure board associated with it. What I also really like about cupping is that practically anyone can use it and perform it. I have a lot of patients that I suggest get a cupping kit for home use, depending on what their problems are. It’s not the answer for everyone or all problems. But when appropriate and properly applied it can be an amazing component to self care.
How to Use Cupping on Yourself or Someone Else
Cupping is relatively easy, inexpensive, highly effective, and readily accessible. It can actually make a change in the cause of a problem while also treating symptoms. Certainly the thought of doing it yourself can be intimidating, especially when looking at the cupping kit with all the different size cups. But with a little training and encouragement most people can quickly learn to cup themselves. Many express amazement at how simple it really is. (Of course you can hurt yourself with anything, so be reasonable and get professional help when appropriate.)
Some sources recognize as many as 10 different types of cupping methods, which could vary according to how you classify them: weak/light cupping, medium cupping, strong cupping, moving cupping, needle cupping, moxa/hot needle cupping, empty/flash cupping, full/bleeding cupping, herbal cupping, and water cupping. It’s not my intent or desire to address all of these, and some are self-explanatory. But let’s take a look at some considerations with using cupping at home:
1. Determine if cupping is appropriate and necessary.
Not every issue is going to benefit from cupping. First, look at the area in question. If there is any type of open lesion or sore then cupping should not be done directly over it (but it may be very appropriate nearby – just not directly over it). This includes fresh surgical scars or suture sites, as the vacuum pressure exerted in cupping may compromise closure and healing. This does not include rashes and closed lesions, as these may do very well with cupping. Then palpate the region. If the skin and hypodermis are tender to light/moderate pressure or pinching then cupping may help reduce this sensitivity.
2. Obtain a cupping kit.
There are many options available online. For the most part they share similar characteristics although quality may vary. I strongly suggest you make sure you are purchasing a kit with plastic cups (not glass, unless you know what you are doing) and also a tube that lets you hold the pump in one hand and the cup in the other. Without the tube you will be limited in body parts that you can reach on yourself.
3. Determine where to cup.
Determining the best location to cup is very individual. Consider the area of pain, the vicinity above and below, and/or where palpation reveals involvement. Appearance and palpation will also guide this. Do not cup directly over skin lesions or scars that are not well healed
4. Choose the appropriate cup size and shape.
Cup size is determined by anatomy. If you are working on an area that is broad and relatively flat, like the lower back, abdomen, or thigh, then the biggest cups are usually the best choice. Smaller sizes work better for bony places or the wrist/ankle regions. Most cupping kits typically come with a variety of cup sizes, and some even have curved bottoms as opposed to flat.

5. Use the tube between the pump and cup.

This is not an absolute always rule, but usually it’s easier to manipulate the cup and reach awkward places on yourself with the tube. If you’re planning on cupping someone else then the tube may not be necessary. The tube allows you to reach most places on the back side of your body, although some places (like the mid-back) are pretty hard to reach even with the tube and assistance from someone can make the treatment a lot easier.
6. Have lotion available.
Lotion allows you to glide the cups over the skin(more on this below), which can reduce the chance of bruising. I use nothing special – any lotion works fine. Others may prefer essential oils or something else. The suction action of the vacuum will not drive any of the substance used into the skin – it will actually pull out sweat and water from the skin, which accumulates in the cup along with some of the lotion.
7. Begin with light to moderate suction.
Dysfunctional tissue is sensitive and can be very painful. Begin with very light suction, glide the cups gently, and modify the amount of suction according to the response. If it’s too painful to tolerate even the most gentle suction and gliding or if a problem area will not resolve then consider using static cupping.
8. Choose dynamic, static, or combination cupping.
To my way of thinking dynamic cupping could have more than one interpretation. The first could be that the practitioner is gliding the cup on the patient which is the technique I prefer. This requires some type of lubricant, and may even necessitate repeat application of the lubricating agent depending on the dryness of the skin and the length of the session. I tend to use generic lotion, but others may use essential oils or something else. This is my favorite method for several reasons: it minimizes bruising as compared to static cupping; it can cover a broad area of dysfunctional tissue; the gliding of the cups mimics massage in a way, but with a decompression element as opposed to a compressive force such as our hands impart; it helps to highlight areas of greatest dysfunction in the tissue, as they will typically be more sore.

A second interpretation of moving/dynamic cupping could be to having the patient actively move the body part that has the cups on it. So if the thigh was being cupped, the patient would bend and straighten the knee, or walk around with the cups on. The challenge with this is keeping the cups on, as movement tends to dislodge them especially if there is lubricant on the skin. Glass cups certainly would not be a good idea in this case! For me the decision to use light, medium, or strong cupping depends on the person and the issue being addressed. Dysfunctional tissue can be very sensitive, so I tend to respect the patient’s pain report and vary the intensity of suction according to their tolerance and response. Sometimes I’ll also use a combination of static and dynamic cupping simultaneously. If there is a particularly stubborn and painful area within a larger area that I am treating, then I may place a cup over the worst spot and leave it still for maybe 1- 5 minutes while I do dynamic cupping around it. I have also placed cups over stubborn and painful fascial densifications that are resisting resolution with manual shearing (for more information on this see my section on Fascial Manipulation). Sources vary as to how long to leave cups in place, and I have read anywhere from 10-30 minutes.
When an area is too painful to tolerate gliding or it is not improving then consider placing several cups in that area, pumping them with low to moderate suction, and leave them in place. The longer they sit there the more likely bruising is to occur. I typically do not leave them in place for more than 1-3 minutes but there are different approaches with this.


9. Determine appropriate length of treatment and frequency.
This can be quite variable. The length of time spent cupping in a session depends on several factors: the size of the area being addressed, the severity of the problem, and the tolerance of the person being cupped. Obviously a large area like the back will justify taking more time, while a smaller body part like the forearm may go much faster. There is no absolute right or wrong for length of time. The same may be said for the frequency or how often to cup. Depending on the problem it might be appropriate to cup every day for some issues, while others may need a break between sessions. The best advice is to listen to your body and heed the response it seems to be giving you.
10. Clean the cups and let them air dry.
Hand soap and warm water work fine to remove the lotion, water, sweat, and oil that the cups will collect.
11. Don’t hesitate to seek help!
While cupping is wonderful and relatively simple, you may get a better outcome by getting some professional guidance with it. I like teaching cupping to my patients that need it while I am treating them. I make sure they are competent, comfortable, safe, and effective to obtain the best results. As with anything it’s good to know your limits. And remember that bruising is optional!
